A Guide to the Work of Roofing Professionals

Roofers Helena MT are skilled professionals who install, repair, and maintain the roofs of various types of buildings. They work closely with architects and builders to ensure that construction is completed according to building codes and regulations.

Roofing

The job requires significant physical stamina and balance, as well as the ability to work at heights. It also requires knowledge of a variety of roofing materials.

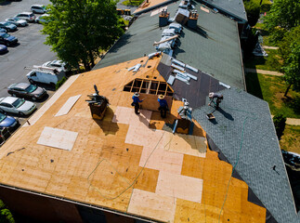
Roofers install, repair, and replace roofs on homes and buildings. They use various roofing materials and follow construction plans and specifications. They may also inspect a building’s interior and exterior to determine how best to proceed with the roofing work. They are also responsible for installing supporting accessories, such as trusses and beams. They must be able to work on ladders for extended periods and have good attention to detail.

A high school diploma is usually required to become a roofer, and on-the-job training is common. Some roofers learn the trade through a formal apprenticeship program, which can take between three and five years to complete. These programs include hands-on training and classroom instruction. In addition to learning the basics of roofing, apprentices must also pass a background check and drug test.

Once they have completed an apprenticeship, roofers can choose to become a journey worker or advance to a position as a foreman. In both positions, roofers are responsible for supervising other workers and ensuring that all work meets quality standards. They must also be able to read blueprints and technical drawings and be able to perform basic math. Additionally, roofers must be able to operate hand and power tools and climb up scaffolding for long periods of time.

Some roofers specialize in commercial projects, while others focus on residential construction. A commercial roofer will often have a different skill set than a residential roofer, as commercial projects have more complex designs and require specialized materials. These professionals will also be able to offer advice on a variety of topics, such as energy efficiency and sustainable building practices.

In addition to being a physically demanding job, roofing is also highly dangerous. In order to be successful in this field, one must have a strong work ethic and the ability to follow safety standards. A strong knowledge of building codes is important, as are good organizational skills. It is also helpful to have a strong eye for details and a willingness to work in a variety of weather conditions. A successful roofer will also have a good understanding of the building industry and its financial aspects.

Education and training requirements

Roofers play a critical role in construction, protecting buildings from the elements and maintaining structural integrity. They typically don’t need a college degree and enter the industry through apprenticeships or on-the-job training. They also must be able to work at heights and have strong manual dexterity. This career is not for everyone, however, as it can be dangerous and physically demanding. In addition, it requires continuing education and training to stay abreast of new materials and techniques.

Most roofers learn the trade informally by working as helpers for experienced professionals. During this time, they take safety classes and learn the basics of removing, cutting, and installing roofing materials. In some areas, roofers may be required to pass a state or regional certification exam to qualify for a roofing license. In general, roofers should be familiar with all types of residential and commercial roofing materials.

Some roofers are employed by roofing companies, while others run their own businesses. Those who are self-employed must have excellent business skills to manage their finances and customers. It is also important for roofers to have good problem-solving skills, as they often encounter unexpected challenges on the job site. They must be able to assess weather conditions and structural issues quickly and find effective solutions.

Many unions and contractor organizations offer apprenticeship programs for prospective roofers. These programs combine on-the-job training with classroom instruction, usually for a set number of hours per week. The length of an apprenticeship program varies depending on the location and local regulations. Individuals with previous construction or roofing experience can progress through the apprenticeship process more quickly.

After gaining sufficient experience, roofers can advance to supervisory positions or start their own roofing company. Some roofers choose to become specialists in particular roofing disciplines, such as shingle or metal roofing. They also can obtain additional certifications, such as a roofing foreman’s certificate.

Applicants for roofing jobs should have a high school diploma or equivalent, good physical condition, and the ability to perform physically demanding tasks at heights. They must be able to follow instructions and work as part of a team. They should also have a strong attention to detail and good communication skills.

Work environment

Roofers construct, cover, and repair the roofs of commercial and industrial buildings, residential homes, and other structures. They use a variety of roofing materials to ensure that these roofs are watertight and weatherproof. They also install insulation and vapor barriers to improve energy efficiency. In addition, they may install gutters and downspouts to prevent water damage. Roofers typically work at heights and in a variety of weather conditions, but they follow safety guidelines to ensure their work meets quality standards.

Roofer jobs require workers to be physically fit and mentally engaged. This career is often challenging, and workers must be prepared to lift heavy loads and continuously knell or bend while working on the roof. Workers must also be aware of the potential hazards associated with working on a roof, including falls and exposure to chemicals and electrical hazards. In addition, roofers must wear appropriate safety equipment.

Roofing is an in-demand skill, and there are many opportunities for people who want to work as roofers. These include specialized projects, such as green or solar roofs, and new construction. This career can be rewarding because it allows workers to directly impact the safety and comfort of families. Moreover, roofers can help with disaster recovery efforts by repairing damaged houses.

While there are many different ways to become a roofer, the best way to start is by enrolling in a registered apprenticeship program. These programs offer a comprehensive education at no cost through a combination of classroom instruction and on-the-job training. Upon completion of the apprenticeship, workers can earn competitive wages and move into supervisory roles.

The work environment for roofers can be dangerous, especially during summer. The intense heat can cause symptoms of dehydration or heat exhaustion. Workers must be able to recognize these symptoms and seek medical attention as soon as possible. This is particularly important because falling from a roof is one of the most common causes of workplace injuries. These workers are also at risk of getting burns from tar or other roofing chemicals. Fortunately, adherence to safety rules can decrease the number of accidents.

Salary

Roofers are skilled tradespeople who install, repair, and replace roofs on residential and commercial buildings. They use a wide variety of materials, including shingles, tiles, slates, and hot bitumen. Some are members of a union, which can increase their wages. Typically, the more experienced a roofer is, the higher their salary will be. In addition to their technical skills, they also need good judgment and communication skills to work with architects and other construction workers.

Roofer salaries can vary greatly depending on a number of factors, such as the job location and state, the average hourly wage, and their level of experience. It is important to know how much the average roofer makes in your area before starting a career in this field.

In the United States, roofers can expect to make an average of $42,700 a year. However, the exact amount depends on a number of factors, such as a region’s cost of living and the demand for roofing professionals. These figures are provided by the Bureau of Labor Statistics.

Those who wish to become roofers should have no fear of heights and be physically fit. They should also enjoy working with their hands and have excellent hand-eye coordination. A high school diploma is not a prerequisite for this position, but a college degree is preferred.

Most roofers learn their trade through on-the-job training or an apprenticeship. Beginners start as helpers, performing simple tasks such as carrying equipment and setting up scaffolding. Later, they can learn how to perform more complex tasks and gain the skills necessary to build and repair roofs.

Roofers can choose to work for a general contractor or a roofing company. They can also choose to specialize in a particular type of roofing system. Once they have a sufficient level of experience, they can advance to supervisory positions or serve as estimators. Eventually, they can even go into business for themselves as independent roofing contractors.

In the summer, roofing companies across the country can expect to see an influx of customer requests. In order to keep up with the workload, these businesses should consider using field service management software to streamline their operations. This software can help you improve employee productivity and efficiency, which is especially important during busy season.

The Importance of Proper Rubbish Removal and Demolition

Proper junk removal and demolition requires adherence to safety protocols and a focus on sustainability. It is also vital to secure the appropriate permits for demolition work to ensure compliance with zoning laws and environmental standards.

Rubbish Removal

Timely building rubbish removal creates a safer working environment for construction workers and reduces the risk of workplace accidents and injuries. It also helps builders to optimise productivity and focus on core construction activities without distractions or delays. Contact Paul’s Rubbish Removal and Demolition for professional help.

The site preparation process is crucial to the success of any construction project. It includes land clearing, demolition, excavation and grading. It also involves locating underground utilities, such as water, sewer, gas and electricity lines. It also requires assessing the subsurface soil conditions. It is important to consider all the health and safety issues involved when preparing a construction site, especially with materials like asbestos, lead paint, petroleum products, treated lumber and roofing debris.

Having the right equipment and skilled operators will increase efficiency and help you complete the work on time. It is also vital to have a plan in place for dealing with unexpected challenges that may arise during the site preparation process. Having contingency plans in place can mitigate delays and budget overruns. Additionally, a thorough inspection and evaluation of the site should be done prior to starting work on the actual building or renovations. This will ensure the safety of the workers and the public and will allow the contractor to make accurate predictions about how long it will take to complete the project.

Permits

Demolition or the complete dismantling of a building or other structure can require an expensive permit. The approval process usually involves inspections to ensure that the work is performed safely and according to regulations. It also includes confirming that utilities are disconnected before demolition begins. The permit process may also include a review of the building for asbestos and other hazardous materials that must be handled properly during demolition and removal.

The permitting and inspection process for a demolition project can take 1 to 7 business days depending on the location and the size of the structure being demolished. For smaller structures, such as sheds, the approval process can be much faster. Regardless of the type of structure being demolished, it is important to apply for the permit as early as possible to avoid delays.

Once the permit is approved, it is important to plan out how you will dispose of all the debris that will be created by the demolition or dismantling of a structure. This planning must include ensuring that any recyclable materials are separated from the other construction waste for disposal and collection. It is important to use an environmentally friendly method for dumping the waste, such as land filling or composting.

In addition, it is necessary to make sure that all open plumbing and sewer lines are capped prior to demolition. This will prevent accidental reconnection of these lines during the demolition process. Finally, the final inspection must be completed to verify that the site has been cleaned and all debris is disposed of in compliance with regulations.

In most cases, all construction and demolition debris will be disposed of at a solid waste management facility. This facility must have a permit and comply with all State and County regulations regarding the disposal of solid waste. It is also required that all debris be weighed at the facility, or, to the extent practicable, a volumetric measurement will be used to estimate the weight of the material. In addition, the solid waste facility permit must be transferred to a new owner or operator if there is a change in ownership.

Safety

A demolition project can cause a lot of debris that needs to be disposed of safely. It’s essential to take the proper precautions and hire a qualified team to ensure the project is done efficiently, safely, and in accordance with local regulations. This includes taking measures to protect the surrounding area and ensuring that all team members are trained and aware of the plan for the work. Using the right tools and personal protective equipment can also help to minimize the risk of accidents or injuries.

A full site assessment is crucial to a safe demolition project. This allows the team to identify any potential hazards, such as unstable structures or buried utilities. It also helps them to prepare the work area, rerouting electrical and plumbing systems where necessary. The safety gear required for the job should include hard hats to prevent head injuries, protective goggles or glasses to protect the eyes, and respirators to prevent inhalation of dust and particulates. The team should also wear durable gloves and steel-toed shoes to avoid injury when handling rough materials.

Demolition can have a huge impact on the environment, especially when hazardous materials like lead or asbestos are involved. To reduce this impact, a full waste management and recycling plan should be in place. This can include preparing containers for sorting and recycling and setting up waste containment areas to limit the spread of contaminants. It is also important to consider how the demolition will affect the local ecosystem and whether any environmental permits are required.

Hiring a professional rubbish removal service can significantly improve the efficiency and safety of your project. They have the experience and expertise to manage complex projects and are committed to sustainable practices. They will recycle, donate, or properly dispose of all junk they collect, which helps create a greener world.

During shed demolition, it’s important to protect the surrounding area by shielding floors, ceilings, and walls with plastic sheets or drop cloths. It’s also important to make sure that the work area is fenced off and that warning signs are posted to keep unauthorized people away from the construction site. A comprehensive safety plan should be in place and regular training sessions should be conducted to ensure that all workers understand the demolition process and follow safety protocols.

Recycling

Managing demolition waste responsibly is vital for project safety, environmental sustainability, and adherence to local regulations. This process includes implementing waste reduction and recycling practices. However, a number of factors can make this task difficult.

For example, if a site is located in an urban area with limited space for storage or has a high population density, it may be necessary to use multiple disposal methods. A rubbish removal company that specialises in C&D waste management can help by establishing proper recycling and disposal procedures. They can also assist with developing a comprehensive waste management plan to ensure compliance with environmental laws and best industry practices.

Waste sorting is a key component of sustainable waste management, ensuring that similar materials are grouped together for easy recycling processes. This also allows for more efficient disposal, reducing the amount of C&D debris sent to landfills. In addition, sorting minimises the risk of contamination, preventing harmful substances from leaching into groundwater and oceans. For example, asbestos and old paint can introduce toxins into the environment, while plastics can disrupt marine life.

Some construction and demolition (C&D) waste can be reused, either as part of another construction project or donated to a charity. This can reduce the amount of debris that is sent to landfills, and it can also save money. However, if there is too much on-site clutter to safely store or transport salvageable materials, it can be helpful to hire a deconstruction service. Deconstruction is a technique that involves taking apart a structure piece by piece, and it can be an effective alternative to traditional mechanical demolition.

For builders with large or ongoing demolition projects, a skip hire service is the most practical way to manage C&D waste. These services offer a range of skip sizes and can provide a waste management solution that is both cost-effective and environmentally friendly. For smaller or one-off clearances, rubbish removal companies can also offer fast and efficient solutions. They can also supply specialist vehicles such as grab trucks that are equipped with hydraulically operated arm attachments for quick and easy loading of bulky and heavy materials.

Tips For Moving Pianos Safely

Pianos are large and heavy objects that can be difficult to maneuver. They require specialized equipment and expertise to transport safely.

It’s generally best to leave this task to professional piano movers. They’re trained to handle the instrument and their liability insurance covers any damage. They also have special equipment like ramps to get the piano on and off trucks. Click the https://www.mountainpiano.com/ to learn more.

Piano moving is a big job that requires the right tools and training to complete properly. Many DIY moves can turn into nightmares for homeowners and their families, but foresight and careful planning can make the process easier for all involved.

If you plan to hire professional movers, create a timeline that accommodates their schedule and allows for sufficient preparation time for the move. It is also important to ensure that you are in possession of the proper permits, notify your building management, and that you have enough space for the piano in your new home or place of business.

It is best to have at least four people to help you move a piano, whether it is an upright or baby grand. These individuals should be physically capable of lifting such a heavy object and should not have any preexisting injuries. In addition to this group, you will also need a dolly that can handle the piano’s weight.

Before the movers arrive, remove all items that are on or around the piano such as vases, furniture, and decorative items. This can save you and the movers valuable time and energy as they will not have to work around these obstacles during the move.

If you have a piano keyboard with a lid, be sure to close and lock it before the move. This can help prevent accidental opening of the keyboard during the move. It is also a good idea to clear a path that the piano will need to maneuver through during the move. This includes all doors, hallways, and staircases. It is also a good idea to measure these spaces to ensure that the piano and its skid board will fit without any issues.

After the piano has been moved into your new home or place of business, be sure to reattach any disassembled parts such as legs and pedals. Afterward, it is a good idea to hire a professional piano tuner to restore the tuning of the instrument. The vibrations and changes in humidity during the move can throw off the tuning.

Transportation

A piano is a beautiful and unique musical instrument, but it can be quite heavy and difficult to move. In order to safely relocate your piano, it is recommended that you use a professional specialty moving company. Piano movers are specially trained to handle all aspects of the process, and they have all of the necessary equipment to transport your piano. However, if you decide to take on the task yourself, there are several important steps that must be taken into consideration.

First, you must prepare the piano for transport by wrapping it in protective blankets and padding. For grand pianos, dismantling the legs and pedals is also often necessary to ensure safe transportation. Once the piano is completely covered and secured, it is ready to be loaded onto a dolly. If you are planning on transporting the piano up or down a flight of stairs, it is highly recommended that you purchase plywood planks to create a temporary ramp. These planks should be the exact length and width of your staircase to ensure safe transportation.

Before transporting your piano, be sure to map out your route ahead of time. This will help to reduce the risk of damage and prevent you from becoming exhausted during the process. It is also important to measure all of the areas that the piano will be passing through, including doorways and hallways. This will help to avoid any unnecessary lifting and reversing that could lead to injury.

Once the piano is on the dolly, it should be secured using ratchet straps to minimize movement during transport. It is also a good idea to put additional padding inside of the truck to protect the piano from unforeseen road hazards. Once the piano has been transported to its new location, it should be unloaded and reassembled. Once the piano is fully reassembled, it should be tested to ensure that all parts are in working order. If any repairs are needed, they should be completed immediately. The piano should then be wrapped in additional blankets and padded to ensure a secure fit in its new home.

Installation

If you’re thinking about moving a piano yourself, there are some things you need to keep in mind. These heaviest of musical instruments are not like couch or mattress sets, and they require professional training to move safely. Professional piano movers use proper lifting techniques to ensure the safety of their customers and themselves. They also have the appropriate equipment, including padded blankets and heavy-duty ratchet straps.

They also have climate-controlled trucks to protect the instrument from extreme temperature changes and humidity fluctuations, which can affect tuning. If you’re going to attempt a DIY move, you should consider renting a climate-controlled truck for the long haul.

Before you start your move, make sure that the truck is big enough to accommodate the piano. If not, you’ll need to rent a larger vehicle. Also, consider obtaining plywood planks to cover stairs that cannot be replaced with ramps. This will help you avoid causing expensive damage to your instrument and your home.

After a careful and slow lift, the piano should be placed on its 4-wheel dolly. This will prevent the piano from damaging walls, doorways and hallways. Then, ratchet straps should be securely attached to the dolly so it won’t shift during the transport process. Finally, padded blankets should be used to guard against marring the exterior and cushioning the piano during transport.

While it is always recommended to hire professionals, there are some homeowners that have no choice but to move a piano themselves. This guide will teach you how to do so in a way that minimizes expletives, injuries and regrets. You’ll need a few strong friends and the right tools, but with some preparation and planning, you can safely move your piano.

While you can save money by moving a piano yourself, there are risks associated with the task. It’s important to understand the dangers of attempting this feat and seek out professional movers who have the experience and the equipment to handle it safely and efficiently. You can find qualified piano movers on uShip, where you can compare quotes from multiple carriers in one convenient place.

Maintenance

A piano is an incredibly heavy and delicate instrument that requires special care during transport to ensure it arrives at its new home in perfect condition. The best way to reduce the risk of damage is to use professional movers who are trained and equipped with proper tools and equipment. Professionals also offer a variety of additional services to enhance your move, including climate-controlled trucks and secure storage. If you’re relocating to a different country, these professionals can even help you navigate customs regulations and obtain the necessary paperwork.

The top challenge during a piano move is maneuvering the instrument through tight spaces and navigating stairs. A good preparation plan starts with carefully measuring doorways, hallways, and staircases to determine whether the piano can pass through. In many cases, disassembling parts of the piano such as the lyre, legs, and music rack may be necessary to lighten the load. Proper wrapping techniques are also crucial to protect the instrument during transit.

In addition, the movers should make sure that the pathways they will use are clear of obstructions. Concrete steps and sidewalks must withstand significant weight during the moving process, so they should be in good condition to prevent injuries to movers and passersby. If they are weakened by cracks or excessive wear, these surfaces should be reinforced or replaced.

Pianos are sensitive to changes in temperature and humidity, so a safe environment is essential for their wellbeing during a move. If possible, professional movers recommend scheduling moves during mild weather conditions. If this isn’t possible, a climate-controlled truck can maintain a stable environment for the piano.

After a move, the piano should be allowed to acclimate to its new environment before getting tuned. This can take several weeks, so it’s a good idea to schedule the tuning appointment fairly soon after the move.

Moving a piano can be a daunting task, especially for DIYers. The last thing you want is to enlist help, buy supplies, and lift the piano only to find out that it’s too big for your doors or staircases. If you’re unsure if you can safely move your piano, consider working with a uShip carrier. You can compare quotes from multiple piano movers in one place, and you’ll have peace of mind knowing that your piano is in expert hands.

What You Need to Know About Commercial Electrical Installation

Commercial Electrical Installation involves laying down conductors to connect the various building parts. It also entails using conduits and special receptacles for energy-draining equipment.

Unlike residential properties, commercial structures have different power demands and unique setups. Professional electricians understand these differences and apply the appropriate solutions for your business.

Wiring is essential for any electrical system, and commercial properties require a complex network of wires to support heavy machinery, hardware systems, and other equipment. The National Electrical Code (NEC) has specific requirements for all aspects of a commercial electrical installation. Failure to follow these standards can lead to dangerous electrical hazards, and the right professionals must handle all aspects of a commercial wiring project.

There are several different ways to wire a commercial property, and each has its pros and cons. The most common method is to use a raceway and conductor setup, which uses stiff or adjustable tubes and conduits that hold multiple insulated phases. This type of wiring can include an equipment grounding conductor, which is required by NEC guidelines.

Another way to wire a commercial property is to use a busway system, which consists of thick-walled conduits that are protected by an outer jacket. This type of system is typically used in industrial facilities, and it helps to protect against fire risks. In addition, it can be more easily routed and adjusted to accommodate changes in power requirements.

Finally, there is the NM cable method, which involves running flexible sheathed copper wires through conduits and rafters. This type of wiring is often used in office buildings and other business structures, and it can be more easily installed than traditional wiring methods.

The most important aspect of any commercial electrical wiring project is to follow NEC guidelines. This includes ensuring that the wiring is properly labeled and that all circuits are grouped together in order to minimize voltage drop and electromagnetic interference. It is also crucial that the proper grounding and bonding practices are followed, as well as following the guidelines for installing overcurrent protection devices (circuit breakers or fuses).

Electrical wiring is an intricate process, and it’s critical that it’s handled correctly to ensure safety and efficiency. A professional electrician will be able to create a detailed electrical plan for the building and determine the best locations for circuits, outlets, and switches. They will also be able to ensure that the wiring is in compliance with local codes and standards.

Sockets

The sockets in a commercial electrical installation allow power to be connected to appliances and machines. They also serve as the entry point for electricity from the power grid, connecting to a distribution panel board that distributes the power throughout the building. Understanding the different types of plugs and sockets helps ensure that a safe, efficient electrical system is in place.

Commercial spaces require more outlets than residential buildings, but the number of sockets needed is determined by many factors including floor occupancy and cabling. The number of sockets must be evenly spaced to avoid overlapping outlets, which increases the risk of fire and overloading. Socket locations are often carefully planned to prevent unauthorized tampering and theft.

A single-phase socket has two current-carrying pins that match the openings and female contacts of an energised plug. Some plugs have a third pin for a safety connection to ground. Plugs are shaped to reduce the risk of bodily contact with live pins, and contacts in sockets may be sheathed in insulation to prevent foreign objects from being inserted into energized metal.

Several different types of sockets are used in countries around the world, and many are compatible with one another. The most common socket type in the United States is NEMA 5-15, which has two flat parallel blades rated for 15 amps at 125 volts and a third pin that connects to a ground wire. There are also NEMA 6-15 and NEMA 14-30 sockets that have similar features but are rated for 20 amps at 250 volts.

In the European Union, a common socket type is the CEE 7/16, which accepts Europlugs and older Israeli plugs rated at 16 A. It has a round socket face with lateral key pins and indentations that maintain polarity and prevent the insertion of plugs with different current ratings.

Some types of sockets, particularly older ones, do not meet technical standards for durability, plug retention force, or temperature rise of components. Safety advocates, electrical manufacturers, and the military recommend using only approved sockets for commercial use.

Distribution Panel Board

A distribution panel board is the heart of any electrical system. It controls the flow of electricity, protecting circuits with breakers or fuses in the event of overloading and offering an immediate shut-off point during emergencies. Whether your building is large or small, a well-placed and configured panel board is the key to efficiently powering your commercial space.

The panel board is usually a large, rectangular piece of metal that is recessed or mounted in a wall or other enclosure. Some are covered with a door that prevents the operator from touching live electrical parts, while others feature a dead front where the handles of the circuit breakers can only be opened when the enclosure is opened. It also has bus bars that carry current from incoming wires and connect to circuit breakers or fuses that distribute power to other parts of the system.

These circuits might include lights, outlets and power points for equipment and appliances in your building. Depending on the type of distribution board, it may have switches and meters for monitoring electrical usage. A good distribution system is essential in your facility because it allows you to safely extend power to equipment without overloading or exposing the wires to too much heat, which can cause fires and other safety hazards.

When choosing the correct main distribution panel, you must consider your electrical needs as well as any future plans for expansion and upgrading. It must also be installed correctly to ensure that your electrical infrastructure is safe and efficient for the long term.

There are many different types of panels, so it’s important to consult with a professional electrician before you install your own. Some are designed for residential use, while others are made for larger industrial applications. Some are called load centers and are similar to fuse boxes, while others are known as panelboards in North America and employ bolt-on breakers. Panelboards are often used in lighting systems and can contain between 6 and 24 ways for devices, with the top right breaker typically serving as the sub panel that feeds the other breakers with their specific voltage of electricity.

Electrical Raceways

Electrical raceways and conductors serve critical roles in commercial electrical systems by providing a physical pathway for electric wiring. Whether buried/underground or surface, they fully enclose wires and cables for protection against corrosion, water, and other physical threats. Raceway systems are also responsible for protecting the inner workings of a commercial wiring system from electric hazards and fire risks, when properly installed per National Electrical Code (NEC) standards.

There are several types of electrical raceways, but metal conduit and cable trays are commonly used in commercial electrical installations. Metal conduit is a type of pipe that acts as a protective conduit for electrical wiring, and it can be bent and fabricated into different shapes to fit the space where it will be installed. It’s a great option for running wires in high-traffic areas or where the wires might be exposed to outdoor elements.

In some applications, especially those in which the conduit must be directly buried underground or concrete encased, metal conduit is required by NEC regulations. For more information on this, read the NEC Articles about buried/underground metal conduit and direct-buried steel conduit.

Unlike metal conduit, cable raceways provide a surface-mounted pathway for wires that is essentially a surface-mounted duct solution. This is ideal for residential and commercial spaces, as it allows the wiring to be hidden behind a wall or recessed into the surface, making it more attractive and less of a safety hazard. Additionally, it can be a simpler installation process than installing metal conduit.

Both conduit and cable raceways come in a variety of materials, including aluminum and copper. It’s important to know which one you need for your application before making a purchase. Depending on the application and environment, there are also different sizes, finishes, and accessories available.

If you’re using a cable raceway, it may be helpful to use a wire cart when taking off the spools of black, white, and ground wire. This helps the wires to fall off in an organized manner and prevents them from getting tangled with each other or with the cable raceway. You can also use a wire stripper to strip the outer covering off the wires so you can easily identify which color goes where.

Tips For Window Cleaning

Window Cleaning Bradenton FL can be easy if you have the right tools. You can do it yourself or hire professionals.

Window Cleaning

Start with a bucket of clean, warm soapy water (washing-up liquid is best). Avoid sunshine exposure as the washing solution will dry quickly leaving streaks. Use a squeegee and a clean microfibre cloth to wipe and dry.

Window cleaners use cleaning solutions to remove stubborn dirt and grime, leaving windows smudge-free. They can also identify and fix problems like clogged channels or painted sashes that block the opening of windows. Some cleaning professionals also use stronger chemicals to remove stains or contaminants that are impossible to get rid of with water. These products, however, present a number of health and safety issues and must be handled with care.

Regular window cleaning helps protect your home or business investment by extending the life of your windows. It is particularly important if your property is located near a road or construction site where spray paint and salt can damage glass.

In addition to removing hard minerals from the surface of your glass, regular window washing can prevent the growth of mold and mildew on windowsills and frames. This can save you money on repair and replacement costs.

Depending on the type of windows you have and your climate, regular window cleaning may also help reduce energy costs. The sun’s rays produce free heat that can be lost through dirty windows. If these rays are blocked by dirt or other contaminants, you may have to crank up the thermostat to maintain a comfortable temperature. Regularly scheduled window cleaning helps eliminate this waste and allows the sun’s rays to fully heat your living space.

While some homeowners choose to clean their own windows, most prefer the professional touch of a reputable and reliable window cleaner. Window cleaning involves a great deal of physical labor, and the proper tools are essential for achieving a superior finish. A professional window cleaner is trained to assess the condition of your windows and will recommend the best course of action based on the results of his inspection.

Most commercial cleaning companies include the inside and outside of the windows in their service. Some may even bundle the cleaning of the sill and frame into the price. Cleaning the frames and sills is a bit more difficult than washing the glass, as there are often nooks and crannies that are hard to reach. The best way to clean them is by using a brush or a sponge with a scrubby side.

Squeegee

Using a squeegee is the best way to clean windows without leaving streaks or dirt behind. It is quick, efficient and economical compared to paper towels or rags. Moreover, it is better for the environment and the health of the window cleaner. It is also an effective tool for removing mold, mildew and dirt from surfaces.

Squeegees are flat rubber tools that scrape off excess liquid from a surface, such as glass, tile or concrete. They are ideal for residential and commercial windows, and can be bought in a variety of shapes and sizes. They are also available in a range of materials, such as metal and plastic. Some are shaped for household use, while others are designed for professional window cleaning.

Most squeegees have a handle and a rubber blade, and can be adjusted to different angles. They can be used with or without soap, and can be wiped clean to prevent build-up. Some are made from recycled materials, making them an environmentally friendly choice.

To use a squeegee, first wet the surface of the window with soapy water. Make sure to wipe down the frame and sill before beginning to avoid any dirt contaminating the cleaned glass. Then, position the squeegee at an angle and run it across the window. Be careful not to apply too much pressure, as this may cause scratches on the surface.

Once the squeegee has been used, wipe it down with a microfiber cloth to remove any remaining dirt and water. This will also help to keep the blade of the squeegee dry, and reduce the risk of bacteria growing on it. It is also a good idea to change the squeegee frequently, especially if it is exposed to sunlight.

Several factors can affect the success of squeegee cleaning, including how large the windows are and how close the window cleaner can get to them. In many cases, squeegee cleaning is not a suitable option for high rise buildings and large storefronts, where there are multiple sections of glass to clean. In such cases, a different method should be used, such as straight pulls or fanning.

Microfiber Cloth

For windows, glass tables and mirrors, microfiber cloths offer an eco-friendly solution without the need for cleaning chemicals. These durable, reusable cloths are highly absorbent and can quickly remove dirt, dust and smudges from glass surfaces for a streak-free shine. Microfiber also dries faster than cotton, so you can easily switch to a dry cloth without having to worry about transferring lint or dirt back onto the surface.

The best microfiber cloths have a split-fiber design that traps and captures microscopic particles like dust, dirt and fingerprints, leaving the surface shiny and streak-free. When choosing a microfiber cloth, make sure it has a soft, lint-free finish, and is ideally sized for the job. Using the wrong size or type of microfiber cloth can leave streaks, scratch the surface and cause damage to the windows and surrounding surfaces.

Several companies manufacture microfiber cloths specifically for cleaning windows and other glass surfaces. Some microfiber cloths have a special honeycomb texture that is particularly effective for wiping away water spots and smudges from mirrors and glass, while others are specialized for applying cleaning solutions or polishing surfaces. Some even come with a spray bottle that can be used to sanitize surfaces or add extra shine.

Many janitorial services have made the switch to environmentally-friendly microfiber cloths, trading in their paper towels for a more hygienic alternative. In addition to reducing waste, these cloths are also much more effective at removing stubborn stains and dirt from glass and chrome. The smooth texture of E-Cloth microfiber cloths is ideal for smooth glass and chrome, while more heavily textured “scrubby” microfiber cloths are suitable for more obstinate residues like stuck-on food particles and dried toothpaste.

Microfiber can be used on its own to clean windows, or in conjunction with a cleaning solution, but it’s important to test the microfiber before use for absorption and lint-free finish. To do so, simply dip a corner of the microfiber in water and observe how well it absorbs. An overly wet cloth will leave behind water stains on surfaces, so it’s important to wring out the cloth thoroughly before cleaning with it. Once the window is cleaned, a dry microfiber cloth can be used to buff the surface and remove any remaining moisture or streaks.

Newspaper

There are many different types of cleaning products on the market today, but some people still use a simple item like newspaper to clean their windows. While this may seem a bit old-fashioned, it is surprisingly effective and can save money over the cost of cleaning supplies.

One of the main benefits of using newspaper for window cleaning is its lint-free structure. Unlike paper towels, newspapers are more rigid and have dense fibers that do not separate to cause lint. Furthermore, the ink on the paper can act as a mild abrasive to help scrub away dirt and dust from the surface of the glass.

Another advantage of using newspaper for window cleaning is that it is reusable. Unlike cloths, which need to be washed after each use, newspaper can simply be discarded when it becomes too dirty to continue cleaning. This can save on laundry detergent, electricity and water. Lastly, newspaper is also cheap and easily available, making it a cost-effective alternative to expensive chemical cleaners.

When using newspaper for window cleaning, be sure to wear gloves to avoid getting the ink on your hands. It is also recommended to work on a cloudy day so that sunlight does not dry the solution too quickly and leave streaks on the glass. Furthermore, make sure to switch out the newspaper often so that it is always clean and free of lint and debris.

To begin cleaning your windows with newspaper, gather the following supplies: a bottle of white vinegar, water, a spray bottle, and a stack of newspapers (preferably older ones). Start by mixing equal parts of white vinegar and water in a spray bottle or bucket. Next, spray the window with the solution. After the solution has been sprayed, take two pieces of newspaper and begin wiping the surface of the glass. Be sure to change out the newspaper often, as it will become dirty and wet very quickly. After the windows have been wiped, use a squeegee to remove any remaining solution and ensure that there are no streaks.

Why Roofing Repair Is Important

Many roofs require repair following a severe storm. Even though hail damage may be easy to spot with dents in metal roofs, missing shingles can go unnoticed for years.

Different roofing materials are best suited for various climates and have different lifespans.

roofing

Between sudden and severe storms, prolonged cool weather, and the general wear and tear of age and use, each shingle takes a beating throughout its lifetime. Wind, hail, snow, sun exposure, and improper roof installation contribute to shingle damage, resulting in leaking or other problems with your home’s structure.

Replacing a shingle isn’t as simple as nailing another one on top of it. The replacement shingle must be the same size as the original or it won’t fit correctly and could cause other shingles to buckle or nails to pop. If you aren’t sure what size shingle your roof has, contact your local roofing contractor for advice.

A hammer, flat pry bar, utility knife, and replacement shingle are your essential tools for the job. Before you start pulling up the damaged shingle, slide your pry bar beneath the shingle directly above it to break its sealer strip connection and expose its nails. Then, slide the pry bar underneath the shingle you’re replacing and lift upward to loosen its nails.

Remove the damaged shingle and carefully slide a new one into place, using your fingers to ensure it fits snugly against the existing upper and lower undamaged shingles. Then, fasten it with its new nails using a caulking gun (about $4 per 10-oz. tube).

If your shingle is simply cracked, rather than torn completely, you may not need to replace it. If you do, apply a thick bead of roof sealant (about $4 per 10-oz. tube) under the crack. Press the shingle down and weigh it down with a brick while it dries for at least 24 hours.

You can camouflage your repair even further by collecting shingle granules from the gutter and liberally sprinkling them over the wet sealant to hide it. Or, you can look for a colored shingle sealant at your local hardware store to conceal the repair. Be sure to test the product on a small section of your roof before applying it to the entire area. This way, you can be certain it will adhere properly and work as intended.

Tiles are a popular choice for roofs because they are durable and attractive. They are available in a variety of shapes, sizes, and colors and can fit any architectural style. They can be molded to mimic chipped stone, shingle-style slate, and even wood shakes. They are also environmentally friendly because they do not deplete natural resources and do not contain any preservatives. They are also long-lasting and can reduce energy costs.

Like any roofing material, tiles can experience damage. This can be from debris falling over the roof, wind damage, the stress of snow or water on the roof, or accidental damage caused by people stepping on or near the tiles. Usually, these damages are to individual tiles and can be repaired or replaced with little cost.

When repairing a tile roof, the first step is to locate the damaged area. This can be done by climbing a ladder to the roof and using a flat pry bar or hammer to lift up the edge of the affected tile. Once the damaged tile is removed, a new one can be placed in its place using the same technique. If the tiles have been cracked or broken, they can be filled with a roofing cement to repair them.

It is important to remember that a tile roof should be maintained regularly to avoid any damage to the structure. This maintenance includes regular inspections of the tiles, fasteners, and sealant. It also includes cleaning to remove stains, mold, and mildew. It is recommended that homeowners hire a professional to perform these services to ensure they are safe and meet building codes.

If you’re looking to install a tile roof, it is important that you research the different options available and consider the benefits of each. Then, you can choose the best option for your home and budget. Be sure to take the time to learn how to properly install a tile roof so that you don’t end up with any problems down the road. In addition, make sure to wear safety equipment when working on the roof, and always be careful when using tools or climbing a ladder.

Metal roofs are becoming increasingly common in residential homes, offering a gunmetal chic that is both stylish and durable. However, they are not cheap and require specialty contractors to put on and repair them. Getting a metal roof repaired quickly can save you money by preventing water damage and other problems down the line.

A metal roof can develop leaks if the seams and fasteners are not properly sealed. Roofing contractors apply a high-temperature, waterproofing underlayment to the entire roof deck and seal around each fastener penetrating the surface of the roof. In addition, a slip sheet, typically rosin paper, is laid between the metal and the underlayment to allow it to expand and contract without damaging the underlayment.

Oil canning is a waviness that appears in the edges of metal roof sheets. It is caused by a loss of elasticity, stress, and rapid temperature changes. Roofing contractors can address this issue by replacing the affected sections of the metal roof.

In addition to the seams and fasteners, metal roofs have flashing, which is a material that diverts water away from certain areas of the roof. It is commonly used around vents, chimneys, valleys, and areas near gutters. Flashing can become damaged by rust, corrosion, or falling objects. Roofing contractors can replace and seal flashing to prevent water leaks.

When repairing holes in metal roofs, it is important that the patching material match the color and texture of the existing metal. Otherwise, it may cause the patched area to experience different rates of expansion and contraction than the surrounding roof. This can lead to premature failure of the patch.

Screws and fasteners that have backed out of their seated positions on the roof are a major source of leaks in metal roofs. This occurs for a variety of reasons including wind uplift, vibration of the metal panels, and freeze-thaw cycles. Roofing contractors can restore the seated position of these fasteners by drilling out the old fastener and inserting a new one with a matching head.

If your roof is made from wood, it is important to keep up with its maintenance. If you do not, rot and other damage can occur. It is also important to keep in mind that wood can rot more quickly than other types of roofing materials, as it provides the perfect environment for fungal spores to thrive. Once spores grow in the moist wood, they will digest it and begin to cause other problems for your roof. The best way to avoid this is by having a professional inspect your roof regularly and getting any issues addressed as soon as possible.

If the wood in your roof is rotting, you may need to consider reroofing. This is a process where the existing roof decking is removed and replaced. This is the best option for addressing a roof that has serious rot and can prevent future leaks.

However, if you do not want to go through the process of a full roof replacement, there are still ways to fix the problem. The most common method is to replace the rotting boards and then use a sealant to ensure that water will not be able to seep into the roof deck.

Another option is to get into the attic and have a look at the roof decking from underneath. If there are any areas of discoloration or water marks, this is a good sign that the wood is rotted. You can then pry up shingles in the affected area, working your way around the entire roof.

You can ask your roofing contractor for more information about the type of wood they plan to use in your roof. If they are reluctant to provide this or if they are charging for a roof replacement without providing a breakdown of the individual components, it is best to walk away.

Roofing Materials to Consider When Re-Roofing Your Home

Re-roofing is one of the best ways to give your home a facelift and can dramatically alter its overall appearance. Choosing Roofing Contractors Lancaster PA is critical in this project because it will impact your roof’s performance and resale value. Asphalt shingles are available in various rich architectural styles, including those that mimic the look of slate and cedar shakes. They perform well in cold climates.

roof

Clay tile roofing is a popular option for homeowners looking to add beauty and charm to their homes. They are durable and come in a wide variety of shapes, styles, colors, and sizes. Typically, they are associated with Mediterranean and Spanish-style homes, but can be found in many other architectural styles. They are also a great choice for areas that experience frequent rains, as they can be effective at keeping the water out.

These tiles can be unglazed, like terra cotta, or factory-fired with a light or cool color glaze. Whether unglazed or glazed, they are extremely durable and have a lifespan of up to 150 years. Their durability and longevity is due in part to their thick construction and clay composition. They are also an effective insulator, which helps to regulate the interior temperature and can reduce energy costs.

Unlike asphalt shingles, which rely on an underlayment to provide waterproofing, all tile roofs are fully waterproofed by the tiles themselves. That said, a high-quality underlayment is still required to provide maximum performance. For tile roofs, a layer of Type II No. 30 or No. 43 felt is recommended. This underlayment should extend up and over the hips and ridges, covering all edges of the tiles and ending at least 6 inches down the side of each tile.

In addition to the underlayment, a clay tile roof requires a solid roof deck or suitable strapping to support it. It should be inspected regularly for signs of leakage or damage, and any issues must be addressed promptly.

Another common concern is debris accumulation. It is important to keep the debris from building up on your roof and blocking the gutters. Taking steps to limit the build-up of debris, such as cleaning the gutters on a regular basis and limiting the amount of debris that lands in the attic, can help prolong the life of your roof.

While clay tile is an attractive and long-lasting roof material, it can be quite heavy. As a result, it is important to have your home’shome’s structure assessed by an engineer to ensure that the structure can support the weight of a clay tile roof.

Asphalt shingles are one of the most popular roofing materials, and for good reason. They offer curb appeal, durability and energy-efficiency. Plus, they’re they’re relatively inexpensive compared to other options like tile roofs and are easy to install for roofing contractors.

Asphalt roofing shingles come in a variety of colors and styles, and you can even choose a premium shingle that mimics the look of cedar shake or slate tiles. Whether you’reyou’re choosing 3-tab shingles, architectural shingles or dimensional shingles, you’llyou’ll find that the materials are built to last and resist damage from extreme weather conditions.

Most shingles are constructed of a base material such as organic felt, fiberglass or a composite blend. Then they are topped with a layer of asphalt and various colored ceramic granules that protect against UV rays. Strips or spots of a thermoplastic adhesive are applied to the underside of most shingles, which helps to bond them together and create a water-tight seal on your roof.

When it comes to sturdiness, many shingles are impact rated, which means that they can withstand a high amount of force before a shingle is likely to fly off or break. In addition, asphalt shingles are good insulators and help reduce air conditioning costs in hot climates by reflecting solar heat instead of absorbing it.

Before you choose an asphalt shingle, be sure to look for the type of quality control standards that are adhered to by the manufacturer. For example, the organic felt used in organic shingles is monitored for moisture content and absorbency. Fiberglass mats are inspected for proper weight and thickness, while the application of mineral coatings is carefully regulated for consistency and uniformity.

Some asphalt shingles may also qualify as performance shingles. These shingles are designed to provide specific benefits such as wind resistance or hail resistance, and can often be found with warranties that span the lifetime of the roof. They’reThey’re a great choice if you live in an area that sees severe storms or frequent hailstorms. If you’re you’re not sure, ask your roofing contractor about the performance shingles that are available for your home.

Metal roof panels are durable and long-lasting, and can be customized to match a building’sbuilding’s architectural style. They also help to make a structure more energy-efficient. These panels are manufactured in a variety of materials, including aluminum, steel and copper. They can be shaped to resemble traditional shingles or designed to create a more modern look.

Stainless steel is a premium roofing material that that’s highly durable and resists corrosion. It’sIt’s also available in a wide range of finish options, from a subtle gray to a polished shine that’sthat’s comparable to a mirror. For these reasons, stainless steel is a popular choice for industrial buildings, commercial structures and skyscrapers.

Another common type of metal roofing is corrugated galvanized steel. It is roll-formed from a wrought iron or galvanized sheet and coated in zinc, aluminum, silicon or other material to improve its strength, impermeability and durability. Some manufacturers offer galvalume, a combination of aluminum and zinc with a paint finish to resist corrosion even better.

Corrugated metal roofs may be fastened to the deck of a structure using clips or nailing, depending on the manufacturer’smanufacturer’s design. Some panels are also able to be curved, which is ideal for dormers and other accent pieces on a roof. When the panels are secured, a ridge cap and a gutter are usually installed to protect against water damage and prevent snow buildup.

Some homeowners opt to install a standing seam metal roof, which is assembled by welding or riveting the panels together. These roofs are able to stand up to intense weather conditions, especially those in coastal areas that can experience heavy rainfall and high winds.

Other roofing systems include the “”tin roof”” or “”copper roof.”” While these are less durable than other types of metal roofing, they are a popular choice for older homes and structures that need an authentic historic appearance. Copper is also a beautiful roofing material that has become more popular for its aesthetic appeal as well as the greenish patina it develops as it ages.

In general, metal roofing can last up to 30 years or more with proper maintenance and care. However, the panels can rust or get damaged by hailstorms. While pea-sized or even dime-sized hail is generally not an issue for a metal roof, larger ice and debris can damage or dent it. That’sThat’s why it’sit’s important to check your homeowner’shomeowner’s insurance policy to see if it covers such storm damage.

A long time industry goal has been to create a roof replacement product that combines the authentic natural appearance of hand split cedar shakes with a variety of homeowner benefits such as fire ratings, impact resistance and low maintenance. Until now, other roofing products such as asphalt shingles, concrete tile and clay tiles have been unable to provide the same level of performance. But new technology has led to the development of a revolutionary polymer composite roofing solution that is virtually indistinguishable from cedar shakes.

The secret behind the success of a composite shake is in how the material is manufactured. Advanced manufacturing processes take a computerized 3D image of the natural product and produce exact molds in which liquid polymers are cast and set. The resulting shingle is an exact replica of the original with minute details like wood grain patterns and texture preserved. The finished product is so close in appearance that even professionals may have trouble telling the difference from a few feet away.

Unlike traditional shingle materials, composite shakes are modeled after slate and real cedar shakes. They are available in a wide variety of widths and colors, so homeowners can create a customized look for their home. Composite shingles also feature fade-resistance, which will keep them looking their best longer than organic shingle roofing.

Impact resistance and durability are other important characteristics of composite shakes. They can withstand much more significant impact than stone slate, clay tile and wood shake/shingle roofs, which is critical in areas prone to hail storms. Many composite manufacturers offer Class 4 hail damage warranties.

Composites are also stronger than organic materials and can resist the effects of climate changes such as heavy snow, rain, wind, heat and humidity. They are also resistant to the freeze-thaw cycle that can crack and dislodge organic materials.

Composites are also environmentally friendly, using recycled plastics in their manufacturing process and being able to be recycled once they’re-they’re no longer needed on a roof. In addition, some polymer roofing products are Energy Star rated and can lower rooftop temperatures to save on cooling costs.