Sprinkler Repair Harrisburg PA systems have a lot of moving parts and can be vulnerable to a wide range of issues that affect their functionality. Recognizing and addressing these issues can save time and money and prevent further damage to your landscape.
This guide will walk you through how to troubleshoot common sprinkler repair issues so your lawn can thrive. We’ll cover everything from broken sprinkler heads to faulty wiring.
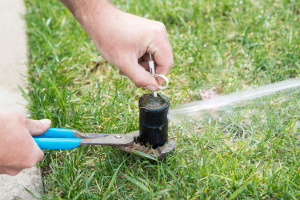
Sprinkler heads are a crucial part of any sprinkler system and they need to be working properly in order for your system to work as it should. Broken heads can cause a wide variety of problems including water waste, uneven coverage, and even flooding. If you notice a sprinkler head that is broken or damaged, the first thing to do is turn off your irrigation system so that you can work on it safely.
The next step is to dig a hole around the broken sprinkler head, making sure that it is large enough to accommodate your new head when you replace it. This can be done using a shovel or a garden trowel. It is important to make sure that you are digging down far enough so that you can reach the head’s riser. After the hole has been dug, carefully lift and unscrew the head from the riser. The best tool for this is a special sprinkler riser removal tool that has a unique key end that locks into the center of the riser and unscrews it from the head. Once the head is removed, use a hand trowel to clear away any dirt or roots that may be stuck to the riser. Then, carefully screw the new riser into the head and tighten it. Be sure to wrap the threads where it connects to the head with Teflon tape for an extra tight connection, but do not apply too much.
Once you have the head replaced, be sure to backfill the soil that was removed so that it is level with the rest of the yard. Then, use the sprinkler head to test it and adjust it if necessary.
If you’re thinking about hiring a professional to help fix your sprinkler system, consider that the biggest cost of a service call is usually the company’s labor charge and not the actual replacement or repair costs. It’s also possible to replace your own sprinkler head and save money this way, especially if you find a company that doesn’t charge a service call fee.
Leaks
Your sprinkler system is divided into zones that control water flow to different areas of your yard. Each zone has a valve that receives signals from the controller telling it to shut off or turn on water flow. Over time, these valves can wear out and develop leaks. Typical signs of a leaking sprinkler valve are standing puddles in your lawn and wet spots on your sidewalk or driveway.
To fix a leaky valve, start by turning off the water to the entire system. You can usually find the main shut-off valve by the water meter, a spigot or near where the outside water branches off from your house’s inside water supply pipe. Once the water is turned off, you can work on the valve without worrying about accidentally turning the sprinklers back on.
A leaky sprinkler valve is a sign of a problem with the diaphragm or solenoid in the valve box. The diaphragm is the part of the valve that shuts off the water flow when you turn the handle on the top of the valve clockwise. It may be able to be repaired, but oftentimes it is better to just replace the valve itself.
Leaking pipes in your irrigation system are a serious issue and can be costly if left unattended. A broken pipe can disrupt the pressure balance within the system, forcing water out of nearby sprinkler heads that could damage them or cause other problems in the area.
If you notice a sudden increase in your water bill, a wet lawn even when it hasn’t rained or a wet spot on the sidewalk or driveway, it’s likely due to a broken sprinkler line.
Before you begin digging to locate the broken line, consult your local utilities company to ensure there are no buried power or gas lines before starting. Once you’ve located the leak, cut off a 4 in (10 cm) section of pipe, clamp the ends and insert a slip coupling to repair it. If you’re having trouble finding the leak, try activating the zones one at a time until you find it.
Faulty Solenoid
The smallest, simplest components can cause the biggest headaches when they don’t work. This is especially true for sprinkler valve solenoids, which open and close on command, and yet can send a whole piece of machinery into a tailspin if they fail to do so.
Solenoid malfunctions can be caused by everything from a simple power disruption to a valve that is misaligned or obstructed. In either case, the outcome can be costly in terms of water wasted and landscape ruination.
Faulty solenoids are often easy to diagnose. If the valve is stuck in the open position (and doesn’t respond to commands from the controller), a quick inspection should reveal the culprit. Usually, debris is the culprit, but other causes can include a corroded terminal or broken wire (or maybe you cut it with your shovel while planting those tulip bulbs last fall).
If the valve remains in the open position after inspection, the problem most likely lies within the controller itself or the wiring from the controller to the valve. Checking for proper voltage at the terminals and ensuring that there is a good connection can resolve most problems.
In some cases, a failing solenoid may be the result of excessive cranking (i.e. repeated jump starts or long periods of idling). The excessive cranking can cause localized heating that eats away at the contacts inside the solenoid, leading to a gradual loss of functionality over time.
One way to test a solenoid is to have someone turn on the water at the controller and then use a multimeter across the terminals of the failed solenoid. If the solenoid is functioning, you should see around 12V at each terminal. If not, it’s time to replace it! A quick inspection of the valve body should also be in order – look for signs of physical damage, such as cracked housing or a worn diaphragm. Preventative maintenance and preventive replacements are the best ways to reduce your risk of a malfunctioning solenoid.
Electrical Issues
A properly working electrical system is vital for home or building safety and efficiency. However, the complex network of wires and connections can be intimidating for the average homeowner who doesn’t have much knowledge about electricity. Fortunately, many common problems are easy to fix with basic maintenance and preventative measures.
If you’re experiencing frequent electrical outages or spikes in your energy bill, it’s time to call an electrician. These issues can be a sign of damaged wiring, inefficient appliances or a faulty power meter. If you’re not sure what’s causing the problem, consult your electric supplier for advice or have an electrician check your wiring.
Another common issue is flickering lights. Often, flickering lights are caused by a faulty switch or a bulb with low voltage. However, if the problem occurs consistently, you may have an electrical wiring problem. Using the wrong voltage on wires causes damage to them and reduces their lifespan. To avoid this, always check the voltage requirements on your outlets and use only approved devices.
Another sign of a potential electrical problem is if your circuit breakers or fuses trip frequently. If you experience this, first try unplugging the devices from the circuits that are affected to lessen the load on them. You can also try distributing your high-powered devices across multiple circuits to prevent overloading them.
Lastly, you should be concerned if your backflow valves are corroded or the electrical connections to them are loose. These issues can lead to a dangerous mix of water and electricity, which can cause fires or injuries. If you have a sprinkler system with aluminum pipes, it’s recommended to replace them with copper as aluminum is more prone to oxidation than other metals.
While some homeowners can resolve minor sprinkler and electrical problems on their own, others will need professional help. In either case, the right tools and guidance can save you money, time and frustration. Keeping your electrical systems in good condition with regular inspections and upgrades is essential for safety. If you’re interested in becoming a licensed electrician, look into electrical trade programs like those offered by Coyne College.