How to Prepare for Roofing Installation

A roof protects your home from the elements and can help maintain its value. But the process of installing a new roof or replacing an old one is complex.

Roofing

You can expect the roofing team to take many safety precautions and use powerful tools like air compressor nail guns, ladders, hammers, and shingles cutters. These tools require proper training and handling to prevent injuries. Visit https://www.northportflroofing.com to learn more.

A roof is one of the most important parts of a home or building. It protects it from weather and other elements, increases energy efficiency, and enhances the curb appeal. It is crucial to maintain and repair a roof as needed. However, roofing installation is a labor-intensive process that requires a high level of knowledge and expertise. Thankfully, there are ways to prepare for a roofing project that ensures the job goes smoothly.

First, clear your yard of toys, bikes, and other items. This is a safety precaution to prevent kids or pets from being injured by falling debris. It is also a convenience for the roofers, who may need to move or clean items out of the way as they work.

Make sure you have an accessible power outlet available for the roofers to use. This is helpful for keeping them powered and can help eliminate downtime while they wait to charge their tools. Clearly marking or showing where these outlets are located can make it easier for them to find them as well.

If you have a garden or flower beds near your house, consider covering them with tarps or placing netting over them during the roofing project. The vibrations created by hammering and sawing can cause plants to become dislodged or damaged. Marking or staking any particularly delicate or expensive plants can help the roofers give them a wide berth.

Lastly, check for electrical wires running through the rafters of your roof. These wires can be dangerous if they are pierced by fasteners or nails. If you have any in-ground electric wires, it’s best to have them professionally removed by a licensed electrician before the roofers start working.

Lastly, notify your neighbors that you will be having roofing work done. This will prevent them from parking in front of your home or blocking access to it. It’s also a good idea to let them know about any noise and traffic congestion that might be caused by the project. Finally, if you have children, it is a good idea to have them stay at Grandma’s or with friends during the roofing project. This will prevent them from getting bored or distracted by the activity and may protect them from the potential dangers of tripping over roofing equipment and materials.

Installation

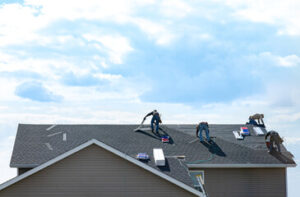
Installing a new roof or replacing an existing one is a meticulous process that requires specialized knowledge and skills. Professional roofing contractors have the experience, equipment and materials required to ensure a high-quality roof that will protect your home or commercial structure for years to come.

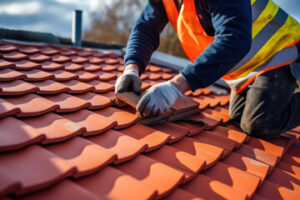
During the installation process, the roofer will cover any plants or structures beneath the shingle area with plastic sheeting to prevent damage. Then they will place the first row of shingles, nailing close to the edge and spreading out as they go along the underlayment.

The roofer will also add any vents, ridge vents and roofing pipes that are necessary for the safety of your home or business. Then, they will seal them with a large bead of roofing cement.

Inspection

Once the shingle installation is complete, the roofers will perform a thorough inspection of the work and clean up. This includes removing all nails, remnants of materials and old roofing from the site. The inspection also checks for areas where water might enter the home, such as loose shingles or cracked mastic around vents and chimneys.

If the roof sheathing is in poor condition, it may be necessary to replace it before moving forward with the reroofing project. The roofers will evaluate the existing decking to make sure it is in good shape and can support the new shingles.

After the roof is inspected, high-quality flashing will be installed over any joints to prevent leakage. This includes the drip edge, as well as the flashing surrounding the roof’s valleys, vents and chimney. If the existing flashing is damaged or missing, it will be replaced with a durable aluminum or galvanized steel product that will keep water out of the home for years to come.

In addition to inspecting the roof, the roofers will also look at the eaves, valleys and trim for damage or wear. This is an important step because it ensures that all elements of the roofing system will work together to defend against the weather and maintain energy efficiency. The roofers will also inspect the gutters for any clogs or water damage. Lastly, the roofers will make sure that all of the roof penetrations are properly sealed. This includes sewer vents, ridge vents and vents for kitchens and bathrooms.

Roofing Installation – Why You Should Do It Yourself

Roofing installation is not an easy project, and it’s usually recommended that homeowners hire a pro for the job. However, if you’re willing to put in the time and effort, you can save some money by doing the tear off yourself.

Roofing

Begin by inspecting the existing roof for damage. If necessary, repair any areas of the roof deck that are damaged.

A roofing job involves the use of a variety of materials. These materials range from asphalt shingles to roof flashing. A good contractor will know how to properly install each of these components, and will use the highest quality materials possible.

The most popular residential roofing material is the asphalt shingle. It is inexpensive and durable, and can be made to match the look of a house. Asphalt shingles are also fire-resistant and can withstand high winds.

For a more unique look, homeowners can opt for a tile roof. Tiles are usually made from genuine clay or concrete, and are very durable. They add beauty to a home, and can be designed to complement Mediterranean, Southwestern or Spanish style homes. However, tile roofs are expensive and heavy, and require a sturdy frame to support them.

Another option is a membrane roof. This is a flat or low-slope roofing system that consists of layers of organic or glass-fiber mats and bitumen. The bitumen can be asphalt or coal tar, and is either heated or cold-applied. The heated type must be hot before it is applied, while the cold-applied type can be applied as a dry adhesive.

Lastly, wood roofs are available for those looking for a more natural and rugged appearance. The most common wood roofs are shingles and shakes. Shingles are milled into a uniform length, width and thickness for a clean look, while shakes are split into wedges for a more rustic and textured appearance.

Preparation

A quality roof installation process typically involves removing the old roof, inspecting the existing deck, making any repairs and installing underlayment, insulation and new gutters. In addition, the roof is sprayed with a waterproofing agent to ensure the roof can defend your home from water damage in the future. This step can take some time and requires the use of heavy equipment like roof hammers, pry bars, RhinoBond machines and dumpsters.

It’s a good idea to prepare your children and pets for the noisy, dusty and jarring process of roofing. Explain to young kids what is happening and be sure that they stay away from the work area. Pets can also be stressed by the noise, and metal flashing can cut them just as easily as a razor. If possible, it may be best for your pets to find alternate lodging while your roof is being installed.

Also, make sure that there is a 15-foot clearance all the way around your house where toys and patio furniture can be stored. The vibrations from hammering and nail gun use can shake the walls inside your home, so it is better to move any delicate items such as mirrors, wall-hung pictures or knick-knacks to a lower level of your home where they will not be damaged. Also, clear the attic of any items that are stored up there, as they can be knocked loose during the roofing process.

Shingles

Shingles are the main component of a roof. They do most of the work in shedding water and are available in many different colors, materials, and styles. Some are more expensive than others, but they all protect your home equally well. Choosing one is mostly a matter of budget, appearance, and how long you want the shingle to last.

Wood shingles have a classic, rustic look and can add a cottage-esque appeal to your home. They’re also water-resistant, which makes them a good choice for homes in persistently rainy or damp areas. They’re more expensive than other shingle types, but they can last for decades when properly cared for.

Clay shingles have a beautiful earthy, natural appearance that complements almost any home. They’re also durable and fire-resistant, making them a great choice for homeowners looking to lower their energy bills. They’re not as lightweight as asphalt shingles, but they still offer an excellent service life and help protect your home from rain, wind, hail, and wildfires.

Plastic shingles are less expensive than slate or other shingle types, but they’re not as durable as wood or clay. They’re designed to mimic the look of other shingle types and come in an array of colors, shapes, and sizes. They can be installed on flat roofs and are resistant to fading, cracking, and mold.

Underlayment

Roofing materials get all the attention, but it’s the underlayment that protects the framing and sheathing from moisture. It also helps keep the roof covering and deck physically separate, which has a few benefits for long-term roof performance.

Choosing the right underlayment is a big decision that depends on where you live and your budget. Asphalt-saturated felt was the most common choice until about a decade ago, when synthetic products started becoming popular. This material is a mix of varying blends of bitumen (asphalt), polyester, and natural plant fibers like cellulose. It has a flexible base layer that gets drenched with asphalt for water resistance. It can tear easily, though, so it requires a good number of nails to hold fasteners.

Other types of underlayment are made from fiberglass, polymers, and even rubber-like materials. While they are more durable than asphalt-saturated felt, most have a higher price tag and require some level of professional training to install correctly. They also tend to have specific instructions that must be followed, including reference lines for horizontal course-run overlaps and a minimum of 6” end laps. Whether you choose synthetic underlayment or traditional asphalt-saturated felt, it’s important to have a drip edge installed along the edges of your roof. This will prevent ice dams and strong winds from blowing water underneath the underlayment and into your home. This will also help prevent wood rot and mold.

Flashing

Flashing is a strip of impervious metal that’s installed at roof intersections or projections like chimneys, dormers, vent pipes, window openings and so on. The primary purpose of flashing is to prevent water leaks that can rot, mildew and encourage insect infestation in walls and roofs. It also guides moisture that would otherwise seep into a wall back outside. Flashing is typically made of galvanized steel, aluminum, or copper.

The type of flashing used depends on the project. For example, headwall flashing is bent and concealed in the siding of a vertical wall and beneath a course of shingles to prevent water ingress from behind the walls. Step flashing is angled and sits between courses of shingle to weatherproof the junction of the roof covering material and the wall, or in the valley of two intersecting roof planes. A piece of step flashing may be formed to deflect water away from a wall or into a gutter, and counter flashing is often found above windows and doors.

Flashing is generally nailed to the roof deck and embedded in a 3-inch-wide application of asphalt plastic cement, which is then covered with a shingle. It’s important that flashing is nailed and embedded before a layer of shingles is laid, because once it’s in place the shingles are unlikely to remove it. Flashing that’s exposed to the elements requires little maintenance other than the occasional cleaning with a household cleaner.

Ridge Cap

The Ridge Cap is a metal cap that covers the highest point of your roof. It’s designed to protect the ridge seam from water infiltration, as well as provide a classic look for your roof.

As the highest point of your roof, the ridge line takes the brunt of many harmful elements. Bad weather, falling tree limbs, and baking sun can all damage the ridge caps, which can lead to leaks and other roof problems. And if the ridge cap isn’t covered properly, moisture can sneak in through the top of your roof, damaging the shingles, insulation, and other roof components.

Ridge cap shingles are typically made of the same material as standard shingle. But they are thicker and pre-bent, which helps them shield the ridge easily and prevent damage. They also come in a variety of designs that match the look of the roofing system they’re paired with.

Some ridge caps include built-in vents that promote proper roof ventilation and help reduce temperatures in your home. They can also prevent air moisture and mold from accumulating in your attic. Ridge caps can last from 10 to 30 years, but it’s a good idea to have them replaced once they start showing signs of wear and tear. A professional roofer can assess the condition of your ridge caps and recommend whether repairs or replacement is necessary. A damaged ridge cap may contribute to costly leaks, and regular inspections will help identify potential issues.